Cleaning up vomit is an unpleasant task, but in busy urban areas like Setagaya, it’s sometimes unavoidable. Whether it’s in your home, a public space, or a business establishment, proper handling is essential for hygiene, safety, and odor control. This guide provides a clear, step-by-step approach for managing vomit cleanup effectively, ensuring that the space is sanitized and safe afterward. If you’re dealing with a situation in 世田谷区, understanding the correct procedures for 嘔吐物 清掃 can make the process much smoother 世田谷区 嘔吐物 清掃.
Understanding the Importance of Proper Vomit Cleanup
Vomit contains bacteria, viruses, and other pathogens that can pose health risks if not handled properly. In Setagaya, where population density is high, improper cleanup can easily lead to contamination of surrounding areas. Not only does thorough 嘔吐物 清掃 prevent the spread of illness, but it also helps in maintaining a clean environment that is visually and olfactorily comfortable for residents and visitors.
Before starting the cleanup, it’s crucial to gather the right materials, including gloves, disposable towels, disinfectants, and masks. Preparing in advance reduces the risk of contact with harmful substances and ensures that the cleanup is done efficiently.
Step 1: Assess the Situation Safely
The first step in vomit cleanup in 世田谷区 is to assess the situation. Determine the extent of the spill and identify any potential hazards, such as broken glass or sharp objects. If the vomit is in a public area, consider cordoning off the space to prevent accidental contact by others. Personal protective equipment (PPE) such as gloves, masks, and even disposable gowns should be worn to minimize direct exposure to pathogens.
Step 2: Remove Solid Matter Carefully
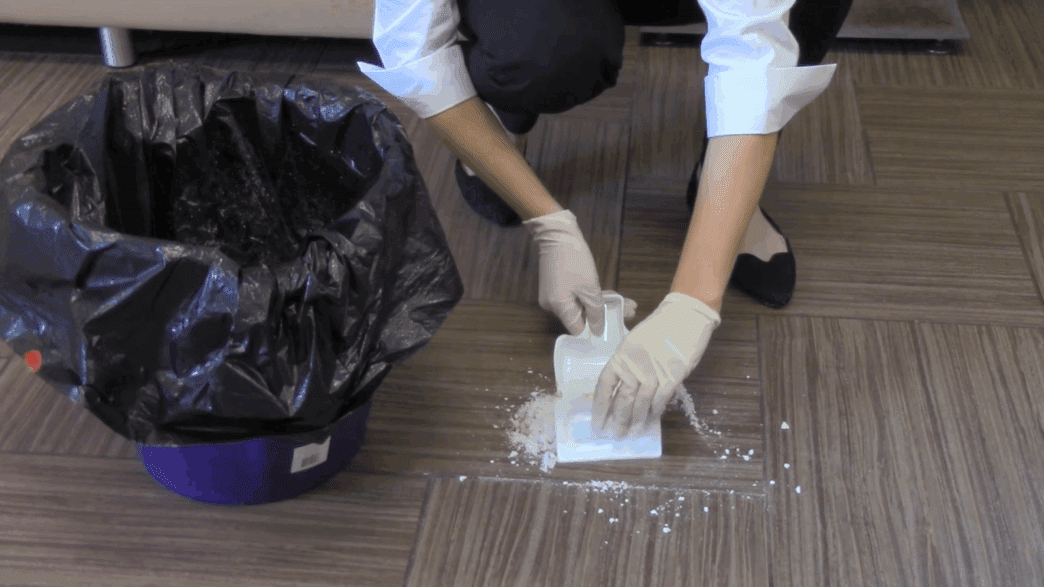
Using disposable tools like paper towels or a dustpan, remove the solid components of the vomit. This step is crucial because it reduces the spread of bacteria during the next cleaning stages. Dispose of these materials immediately in a sealed plastic bag to prevent odors and further contamination. In Setagaya, where waste management is strict, following local disposal guidelines is essential when performing 嘔吐物 清掃.
Step 3: Absorb the Liquid Components
Once the solid matter is removed, the remaining liquid needs to be absorbed. Use absorbent materials such as paper towels, cloths, or specialized absorbent powders. Press down gently to soak up as much liquid as possible without spreading it further. For carpeted or upholstered surfaces, consider using a wet vacuum for more efficient removal. Proper absorption is key to preventing stains and lingering odors in the area.
Step 4: Disinfect the Area Thoroughly
After removing the vomit, disinfecting the affected area is essential. Use a strong disinfectant that is effective against bacteria and viruses. Apply the solution generously and let it sit for the recommended time before wiping it away. For porous surfaces like fabric or carpets, consider multiple applications or specialized cleaning agents. In 世田谷区, following local health guidelines for disinfecting contaminated areas is important to ensure proper hygiene and public safety.
Step 5: Clean Surrounding Areas
Vomit can easily spread beyond the immediate spot. Clean the surrounding floor, walls, or furniture to ensure no residual pathogens remain. Pay special attention to corners, crevices, and areas where liquid might have splashed. Comprehensive 嘔吐物 清掃 helps prevent cross-contamination and makes the space safe for use again.
Step 6: Odor Management
Even after cleaning, vomit odors can linger. Use deodorizing agents or natural solutions such as baking soda or vinegar to neutralize unpleasant smells. Ventilating the area by opening windows or using fans can also accelerate odor removal. In high-density districts like Setagaya, managing odor is crucial for maintaining a comfortable environment for residents and visitors.
Step 7: Dispose of Waste Properly
All materials used in the cleanup, including gloves, paper towels, and absorbent cloths, should be disposed of safely. Seal them in plastic bags before placing them in appropriate waste bins. Following proper disposal procedures in 世田谷区 ensures that waste does not become a secondary source of contamination or odor.
Step 8: Final Inspection and Safety Checks
After cleanup, inspect the area carefully to ensure that all vomit traces have been removed and the space is disinfected. Check for lingering odors, sticky residues, or stains that might require additional attention. Ensuring that the area is fully cleaned not only promotes health safety but also restores the comfort and aesthetics of the environment.
When to Consider Professional Help
In some cases, especially in public spaces, restaurants, or commercial buildings, professional cleaning services may be necessary. Experts specializing in 嘔吐物 清掃 in 世田谷区 have the proper tools, experience, and cleaning agents to handle large or hazardous vomit incidents safely and efficiently. Hiring professionals can save time, reduce health risks, and ensure that cleanup meets local sanitation standards.
Preventive Measures for Future Incidents
While it’s impossible to prevent all vomiting incidents, certain measures can reduce their frequency and impact:
-
Keep emergency cleaning kits readily available, including gloves, disinfectants, and absorbent materials.
-
Establish clear protocols for staff or household members on how to respond quickly to vomit spills.
-
Encourage hygiene practices, such as hand washing and sanitizing surfaces regularly, to reduce the spread of germs.
Implementing these strategies ensures that any future incidents in 世田谷区 are handled promptly and effectively.
Conclusion
Vomit cleanup may not be a pleasant task, but following a structured approach ensures safety, hygiene, and peace of mind. From assessing the situation to disinfecting and odor management, each step plays a critical role in effective 嘔吐物 清掃 in Setagaya. Whether handling a small spill at home or a larger incident in a commercial space, careful attention to detail protects health and maintains cleanliness. Remember that in more complex or hazardous cases, professional cleaning services can provide the expertise and equipment needed to handle vomit incidents safely. By following this step-by-step approach, you can restore any space to a safe and sanitary condition quickly and efficiently.