Converting old VHS tapes to DVD is a smart way to preserve cherished memories and important recordings before the tapes degrade over time. VHS tapes are prone to wear, mold, and magnetic loss, which can make your videos unwatchable after a few decades. By converting VHS to DVD, you ensure that your memories remain safe, easy to view, and shareable for many more years. If you’re new to this process, this guide will walk you through everything you need to know about VHS to DVD conversion — from understanding the equipment to achieving the best video quality.
Why You Should Convert VHS to DVD
VHS tapes were once the most common way to record and watch videos at home. However, with the rise of digital formats, VHS players have become rare, and tapes can easily degrade. Converting VHS to DVD provides several benefits:
Long-Term Preservation: DVDs are less prone to physical degradation compared to VHS tapes.
Space Saving: DVDs take up much less storage space than bulky VHS tapes.
Ease of Viewing: DVDs can be played on modern devices and easily transferred to digital formats.
Better Organization: You can label and categorize DVDs more efficiently than VHS tapes.
Editing Possibilities: Once converted, you can edit your videos, cut unwanted parts, or even add menus and chapters.
What You Need for VHS to DVD Conversion
Before starting, gather the necessary equipment. You’ll need a combination of hardware and software to successfully convert VHS to DVD.
VHS Player
You’ll need a functioning VHS player to play the tapes. If you no longer have one, you can find affordable used models online or at local thrift stores. Make sure it’s in good working condition and has the proper video and audio outputs.
DVD Recorder or Capture Device
There are two main methods to convert VHS to DVD:
Standalone DVD Recorder:
This is the simplest method. Connect your VHS player directly to a DVD recorder using RCA cables (red, white, yellow). Press play on the VHS and record on the DVD recorder. The process happens in real-time.
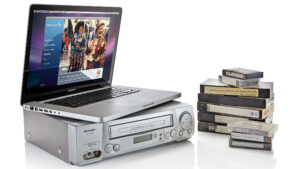
Computer and Video Capture Device:
This method gives you more control and editing options. You’ll need a video capture device that connects your VHS player to your computer via USB. The capture software records the video and allows you to edit it before burning it to DVD.
Blank DVDs
Choose high-quality blank DVDs (preferably DVD-R) to ensure durability and compatibility with most DVD players.
Conversion Software
If you’re using a computer-based setup, you’ll need video capture and DVD-burning software. Popular options include:
Roxio Easy VHS to DVD
CyberLink PowerDirector
Adobe Premiere Elements
Nero Video
These programs allow you to record, edit, and burn videos to DVD seamlessly.
Step-by-Step Guide to Convert VHS to DVD
Step 1: Set Up Your Equipment
Connect your VHS player to your DVD recorder or video capture device using RCA cables. Ensure the cables are properly inserted into the corresponding color-coded ports.
Step 2: Test the VHS Tape
Before converting, play your VHS tape to check for issues such as static, tracking problems, or damaged sections. You can clean the VHS tape using a soft cloth or a tape cleaner if necessary.
Step 3: Start the Recording Process
If you’re using a DVD recorder, insert a blank DVD into the recorder. Press play on the VHS player and record on the DVD recorder simultaneously. For computer setups, start the capture process in your software while playing the VHS tape.
Step 4: Monitor the Conversion
Keep an eye on the recording process. VHS to DVD conversion occurs in real-time, so a two-hour tape will take two hours to convert. Avoid interruptions, as stopping the process may result in incomplete recordings.
Step 5: Finalize the DVD
Once the recording is done, finalize the DVD. Finalizing makes the DVD playable on other DVD players. Most recorders will have a “Finalize” or “Disc Finalization” option in the menu.
Step 6: Label and Store Your DVDs
Use a soft-tip marker to label each DVD with the title and date. Store them in protective sleeves or cases away from direct sunlight and moisture.
Tips for Better Quality Conversion
Use a High-Quality VHS Player
Not all VHS players are the same. Some have better playback heads, which can significantly improve the video output quality. Using a player with built-in noise reduction or S-Video output can yield sharper results.
Clean Your VHS Tapes and Player
Dust and dirt can cause playback issues and video distortions. Always clean the VHS heads and tapes before conversion to ensure a smooth transfer.
Adjust Tracking
If you notice horizontal lines or flickering during playback, use the tracking buttons on your VHS player to adjust the image quality.
Use S-Video Connection (if available)
S-Video cables offer better image quality than standard composite cables. If both your VHS player and recorder support S-Video, use that connection for a cleaner picture.
Edit and Enhance Before Burning
If you’re using a computer, take advantage of editing tools. Trim unwanted parts, adjust brightness and contrast, stabilize shaky footage, and even add titles or transitions before burning to DVD.
Alternative: Converting VHS to Digital Format First
If you want even more flexibility, consider converting VHS to a digital format (such as MP4) before creating DVDs. Once you have a digital copy, you can:
Store it on external drives or cloud storage
Share it easily online
Burn multiple DVD copies later if needed
You can still use the same video capture device and software for this process — just choose a digital output format instead of DVD.
Common Mistakes to Avoid
Skipping Tape Inspection: Damaged tapes can cause errors during transfer. Always inspect and clean them first.
Not Finalizing the DVD: Without finalization, the disc may not play on other devices.
Using Low-Quality Discs: Cheap discs can fail over time, leading to data loss. Invest in reliable DVD brands.
Ignoring Backup Copies: Always make an extra copy of important DVDs in case of damage or loss.
Conclusion
Converting VHS to DVD may seem daunting at first, but with the right tools and a little patience, anyone can do it successfully. This process not only safeguards your old recordings but also makes them easier to share with family and friends. Whether you choose a standalone recorder or a computer-based method, taking the time to convert VHS to DVD ensures that your favorite moments from the past stay alive in a modern, durable, and accessible format.
 Converting old VHS tapes to DVD is a smart way to preserve cherished memories and important recordings before the tapes degrade over time. VHS tapes are prone to wear, mold, and magnetic loss, which can make your videos unwatchable after a few decades. By converting VHS to DVD, you ensure that your memories remain safe, easy to view, and shareable for many more years. If you’re new to this process, this guide will walk you through everything you need to know about VHS to DVD conversion — from understanding the equipment to achieving the best video quality.