If you are a homeowner with Kitec plumbing in your house, it’s crucial to address the potential risks it poses. Kitec plumbing was a popular choice between the 1990s and early 2000s, but over time, it has been found to degrade and fail prematurely. Fortunately, replacing Kitec plumbing isn’t impossible, and with the right knowledge, you can tackle this project effectively. Here’s a detailed, step-by-step guide on how to replace Kitec plumbing, and how to protect your home from future issues.
What is Kitec Plumbing and Why is it Problematic?
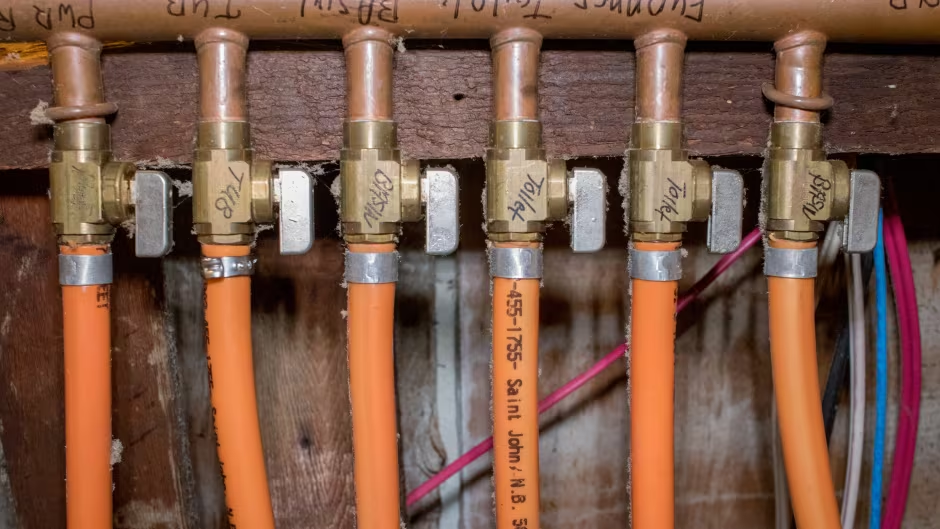
Kitec plumbing is a type of plumbing system made from a combination of aluminum and plastic, often identified by its blue and orange color. Although initially popular for its affordability and ease of installation, Kitec plumbing has been known to corrode, leading to leaks and potential flooding in homes. The material tends to degrade under pressure, heat, and the chemicals in water, which can result in catastrophic pipe bursts over time.
Signs that You Have Kitec Plumbing:
- Discoloration of water.
- Low water pressure.
- Leaks or sudden pipe bursts.
If you notice any of these signs, it’s time to replace your Kitec plumbing to avoid costly damage.
Step 1: Assess Your Plumbing System
Before you start replacing your Kitec plumbing, it’s important to assess your entire plumbing system. Start by locating all the Kitec pipes in your home. Look for the color-coded pipes (blue for cold water and orange for hot water) and check if there are any fittings or joints made from Kitec materials.
Note: If you’re unsure whether your plumbing is Kitec, consult a professional plumber or visit Pom Plumbing to learn more.
Step 2: Shut Off the Water Supply
Before any work begins, always ensure the water supply to the house is shut off. This will prevent any flooding while you work on replacing the pipes. Locate the main water shut-off valve, usually found near your water meter or in the basement, and turn it off.
Step 3: Prepare Your Tools and Materials
You will need the following tools and materials to replace your Kitec plumbing:
- Pipe cutter or hacksaw
- Wrenches (adjustable or pipe)
- Replacement pipes (copper or PEX)
- Fittings and adapters
- Soldering kit (for copper piping)
- Pipe insulation (optional, for added protection)
Make sure you have all the necessary materials before you start the job to avoid interruptions.
Step 4: Remove the Kitec Pipes
Once you have everything ready, begin by cutting the Kitec pipes carefully. Use a pipe cutter or hacksaw to make clean cuts in the plumbing, ensuring you do not damage any other nearby pipes or connections. If there are any fittings or valves attached to the Kitec system, use wrenches to remove them as well.
Important Tip: Wear gloves and goggles for safety during this process.
Step 5: Install the New Plumbing System
After you’ve removed all the Kitec pipes, it’s time to install the new plumbing. You can opt for copper or PEX (cross-linked polyethylene) piping, both of which are more durable and reliable than Kitec.
For Copper Pipes:
- Cut the copper pipes to the required lengths.
- Use a soldering kit to join the pipes together, ensuring the connections are secure and leak-free.
For PEX Pipes:
- Measure and cut the PEX pipes to the desired lengths.
- Use compression fittings or crimp rings to attach the pipes together.
Make sure that each connection is tight and leak-proof. Test the system as you go to ensure that everything is installed correctly.
Step 6: Test the New Plumbing System
Once the new pipes are installed, turn the water supply back on and check for any leaks or issues. Test all faucets and valves to ensure the new plumbing is functioning properly. If you notice any issues, turn the water supply off and address the problem before retesting.
Step 7: Insulate and Secure the Pipes
To further protect your new plumbing, consider insulating the pipes, especially if they are located in areas prone to freezing temperatures. This will help prolong the life of the pipes and prevent potential damage in extreme conditions.
Make sure the pipes are properly secured to prevent any movement that might cause damage over time.
Step 8: Call a Professional if Needed
While replacing Kitec plumbing can be a DIY project, it can also be complex, especially if you’re unfamiliar with plumbing systems. If at any point you feel unsure or uncomfortable with the process, don’t hesitate to call a licensed plumber. They can handle the replacement of Kitec plumbing professionally and safely.
Why Replace Kitec Plumbing?
Kitec plumbing has been linked to numerous issues, including leaks, burst pipes, and water damage. Replacing Kitec plumbing is an investment in your home’s future and helps prevent costly repairs and water damage. Additionally, many insurance companies no longer cover homes with Kitec plumbing, so replacing it ensures you’re not caught off guard in case of an emergency.
Conclusion
Replacing Kitec plumbing is a vital step in protecting your home from potential damage. While the process requires careful attention and proper tools, it’s definitely a manageable task for homeowners who want to ensure their plumbing system is reliable. If you are unsure about how to proceed, or if you need professional assistance, feel free to contact experts at Pom Plumbing for guidance.
By following this step-by-step guide, you can replace Kitec plumbing with more durable options, ensuring peace of mind and a more secure home.